How to connect Midjourney API into Bubble Apps!
Posted on 2024/3/6 by GoAPI
Hi guys!
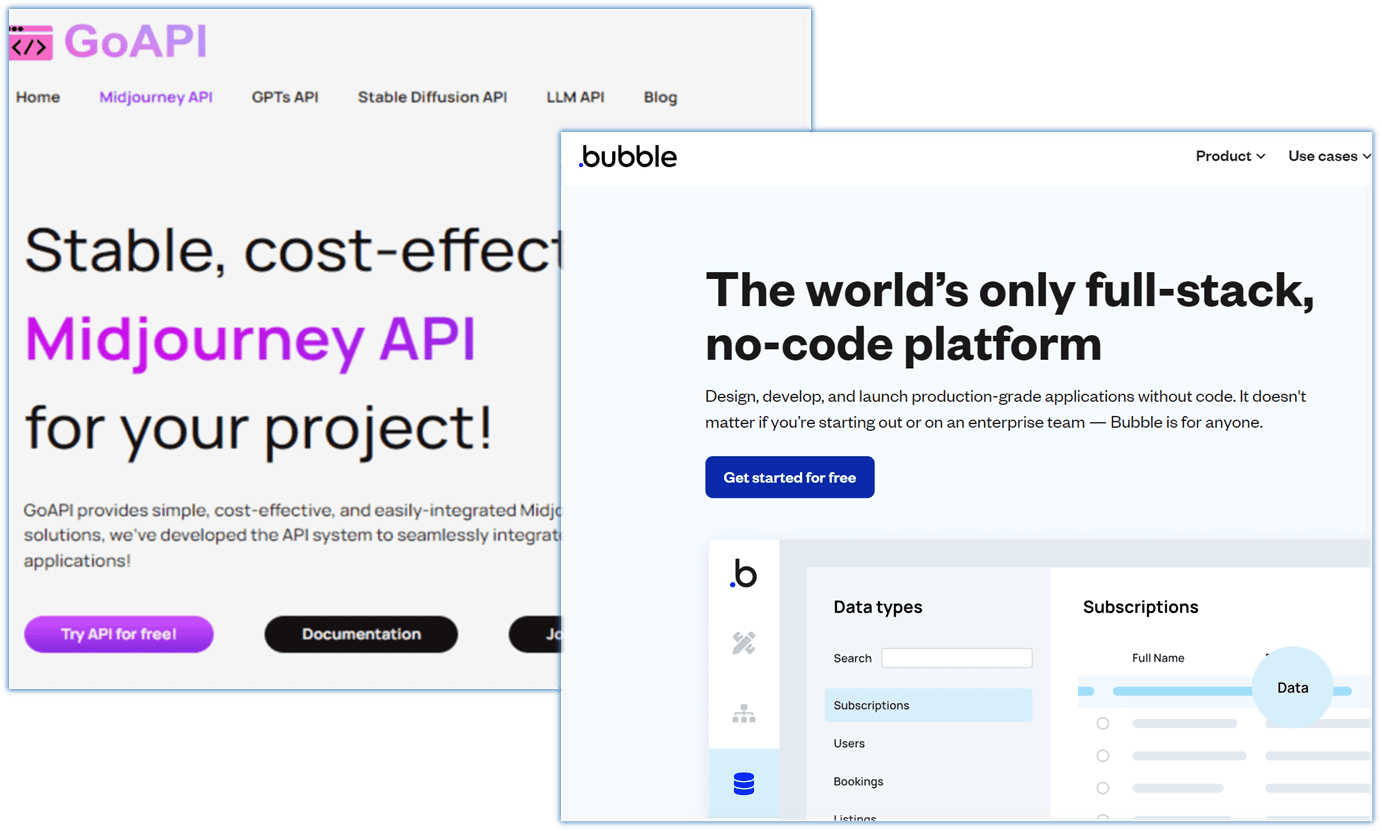
Bubble users will still have to know Bubble basics such as registering for an account, creating elements and pages, debugging, launching your app, etc. These basic Bubble operations will not be covered in this tutorial. This tutorial will only cover integrating Midjourney API into a Bubble App.
Getting Started
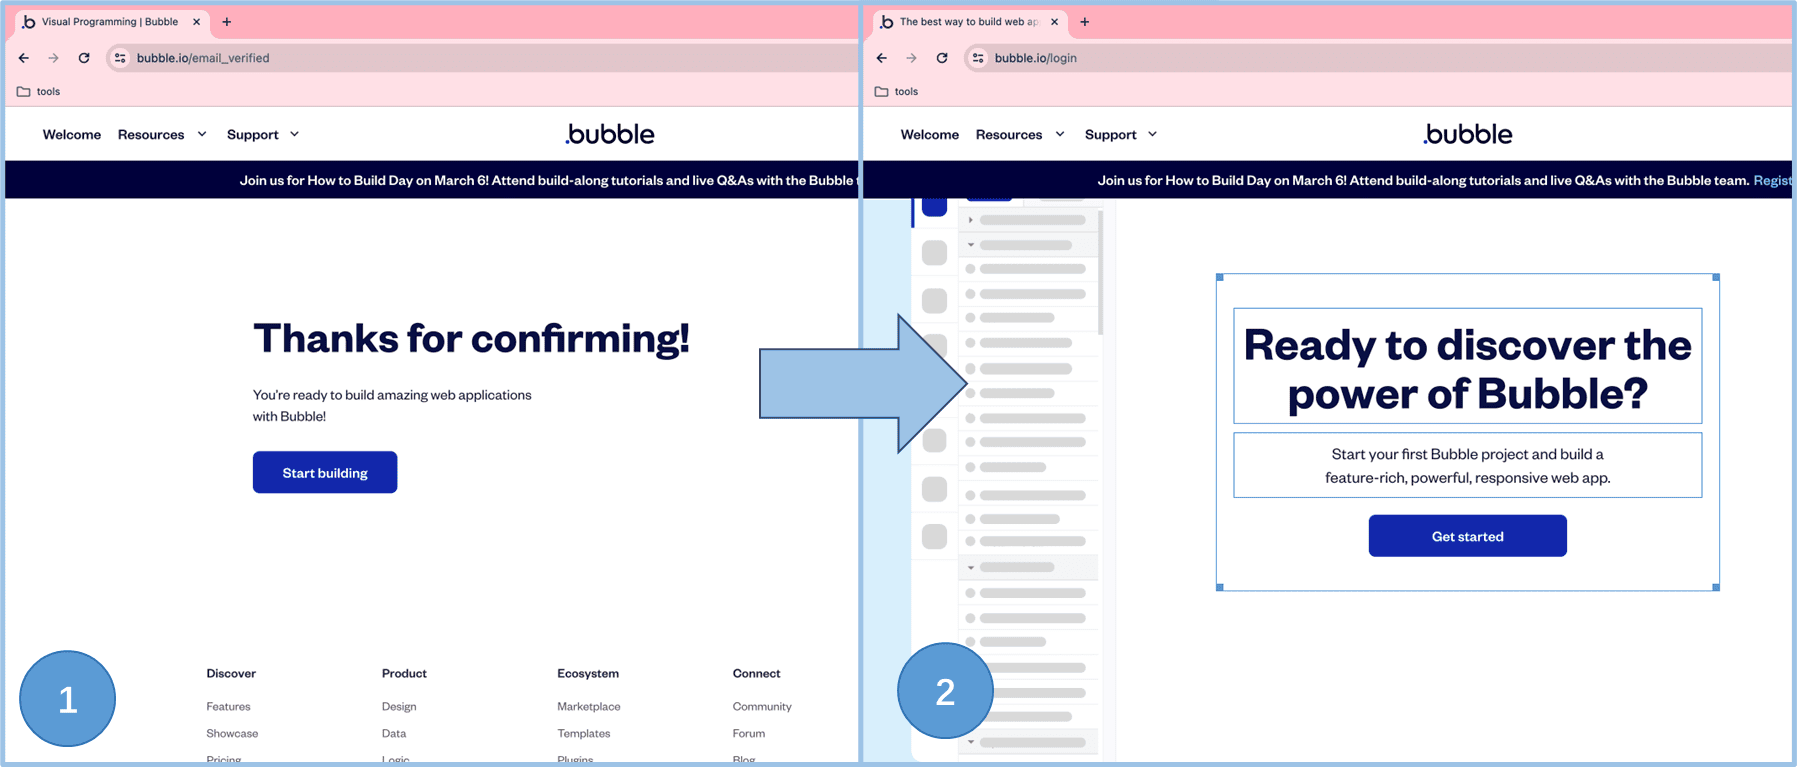
After registering for a Bubble account, you'd click on 'Start building' ---> 'Get started' to start building an app.
Next, do the following set-up steps as per Bubble's guide:
- 1.Upload your favicon
- 2.Set your default font
- 3.Set your default colors
- 4.Add the 'API Connector' plugins to you application (this is a premium feature which requires their 'Starter Plan', and they have a 14 days trial that you can test out)
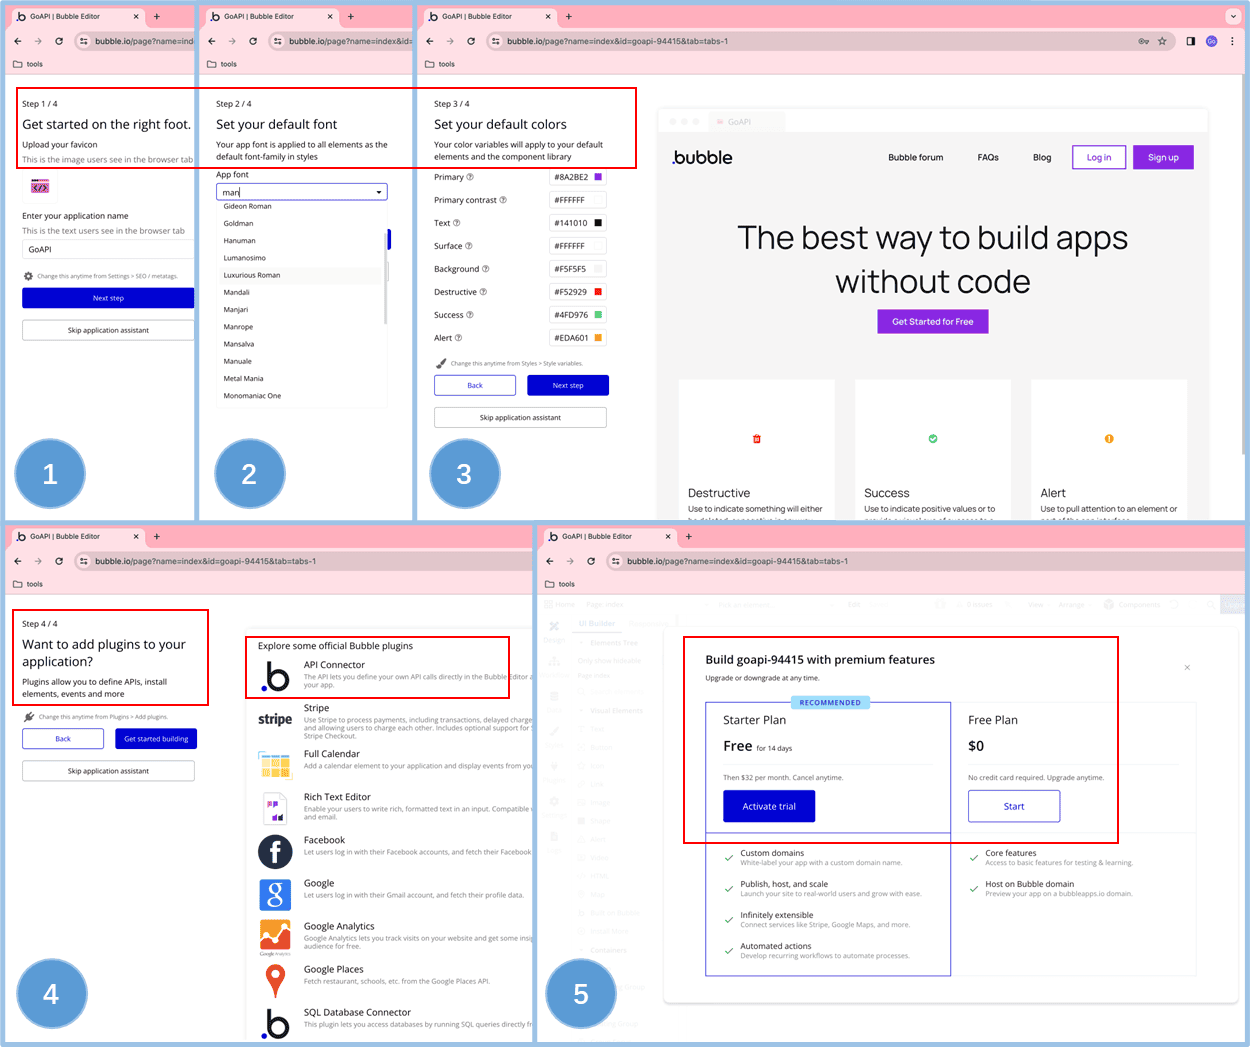
Setting up the APIs
After selecting the Starter Plan and creating an app, we would go to our app, click on 'Plugins' and choose the 'API Connector', and we will begin setting up the three endpoints we are going to demonstrate as part of this tutorial: imagine, fetch, and upscale endpoints.
Imagine Endpoint
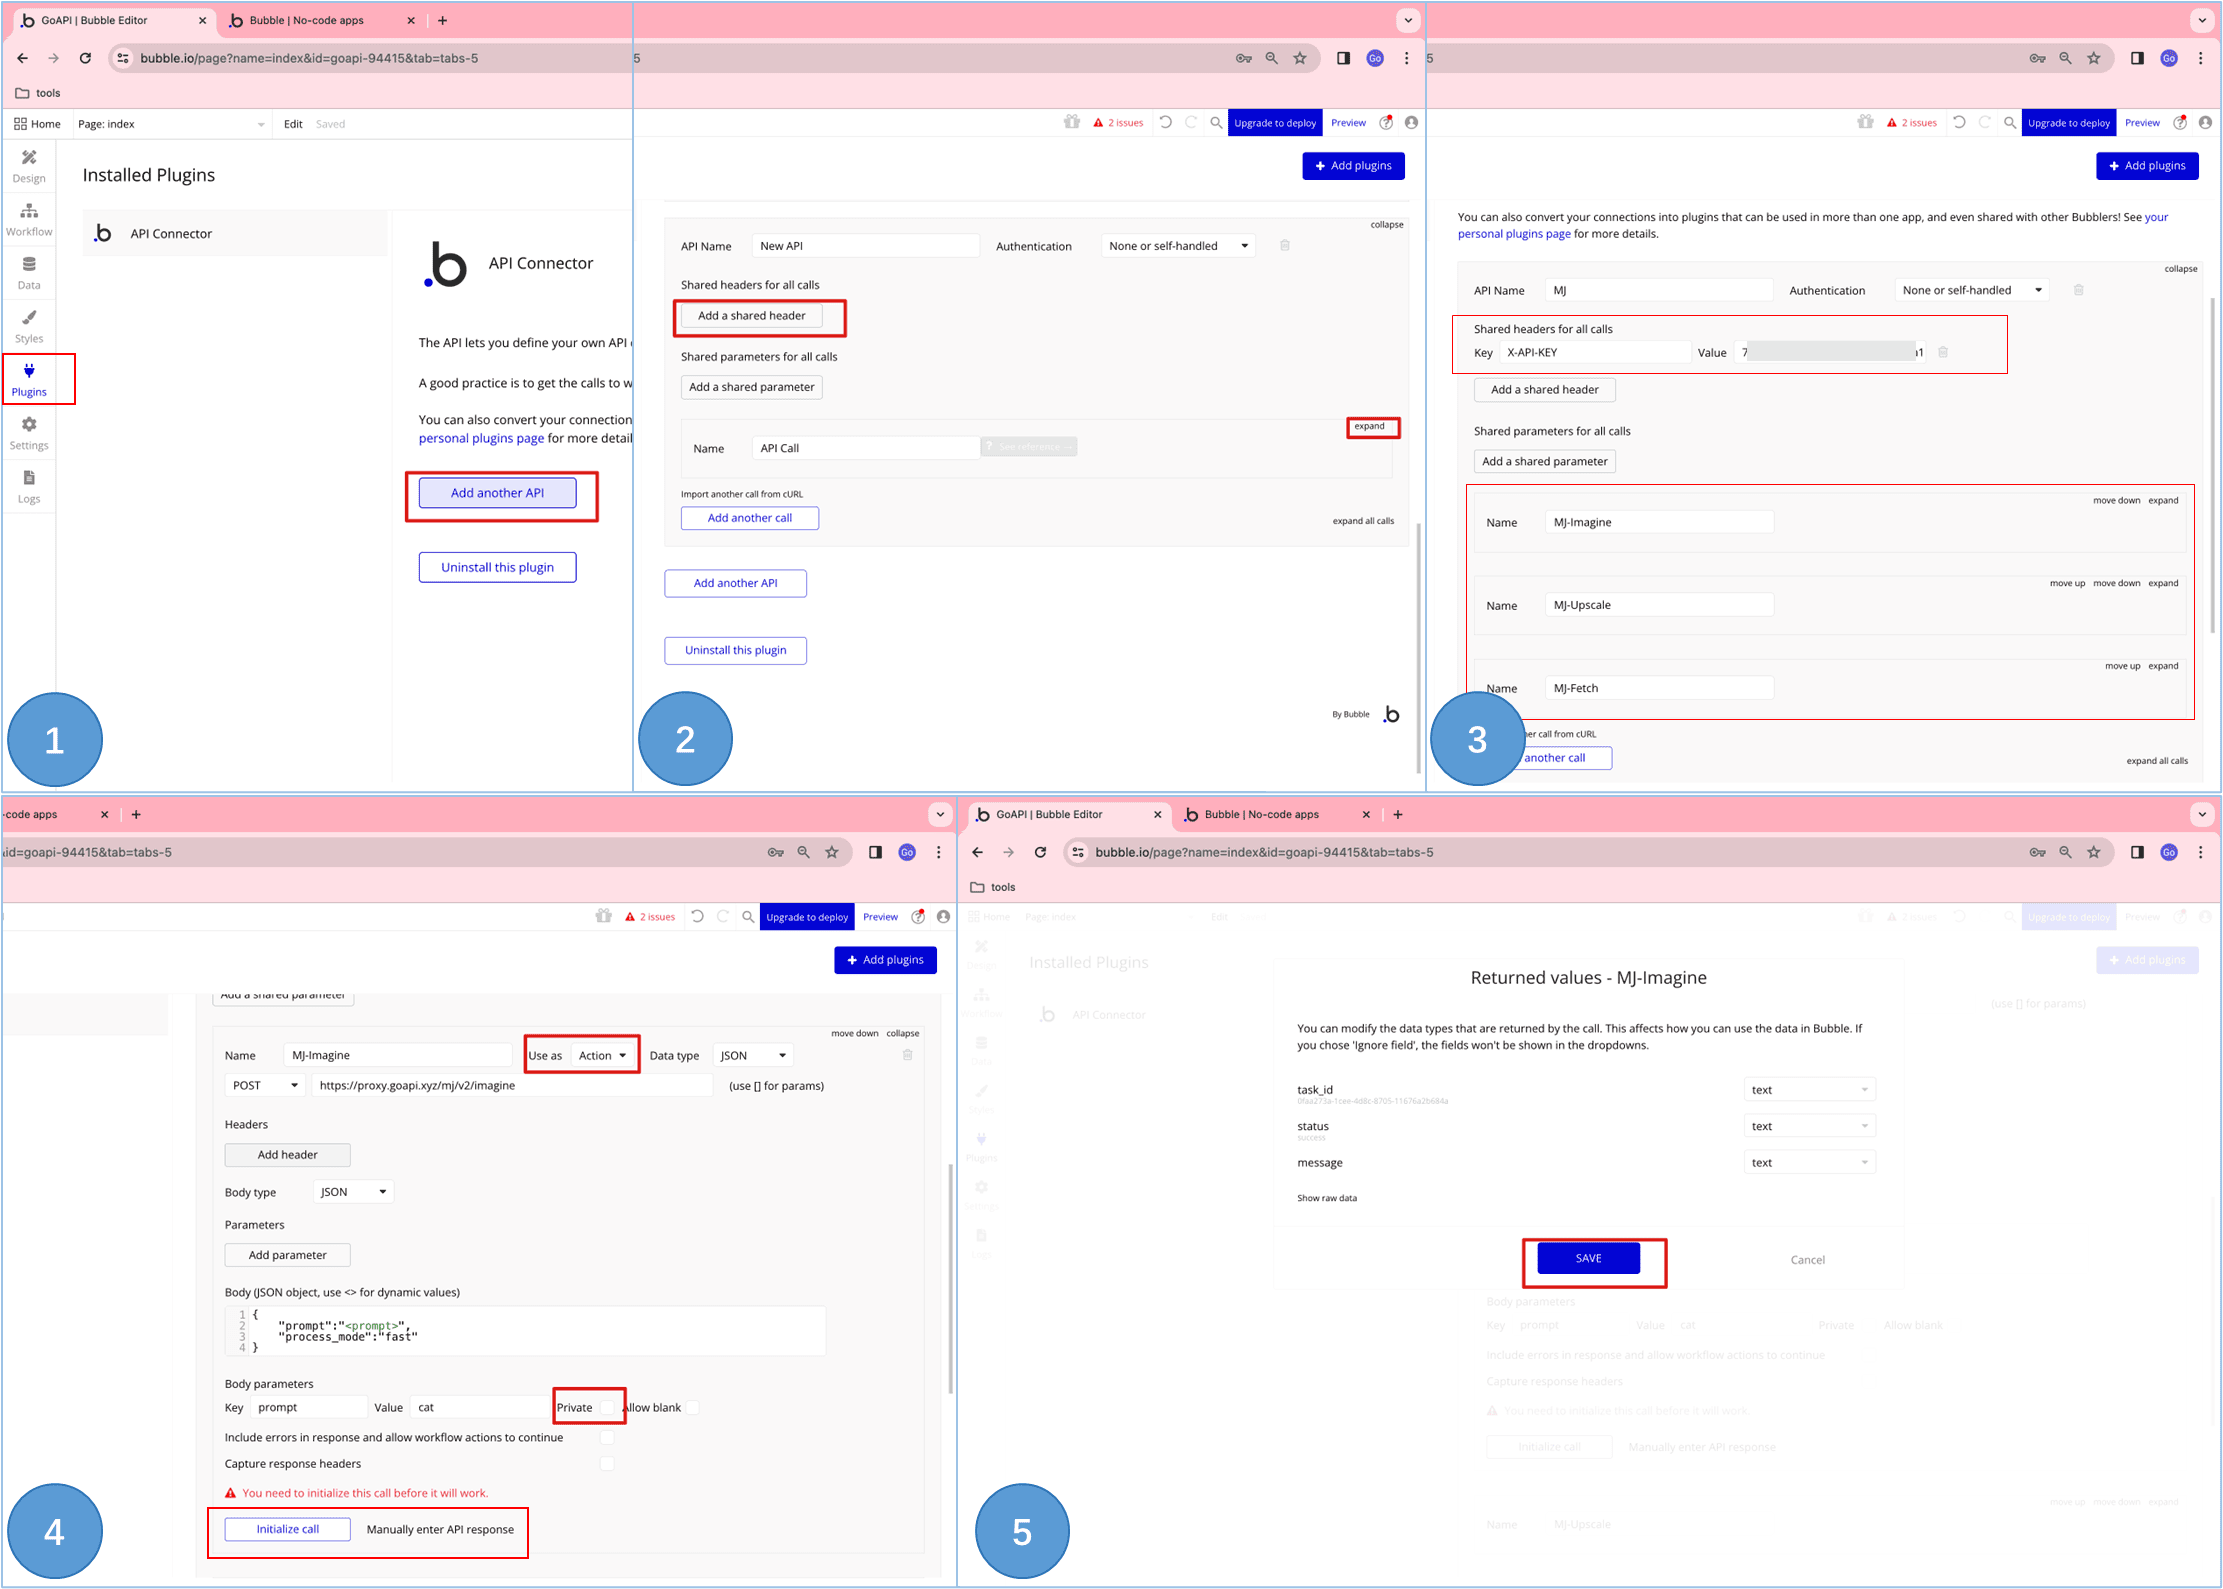
As shown in the illustration above, user should do the following steps to set up the imagine endpoint in Bubble's API connector.
- 1.Click the 'Add another API' button on the page
- 2.Click on 'Add a shared header', 'Add another call', fill out the names, and expand the section
- 3.Add an API name, 'X-API-KEY', and your API KEY value
- 4.Change the 'Use as' to 'Action', uncheck the 'Private' checkmark, and 'Initialize call'.
- 5.'Save' the settings.
Fetch & Upscale Endpoints
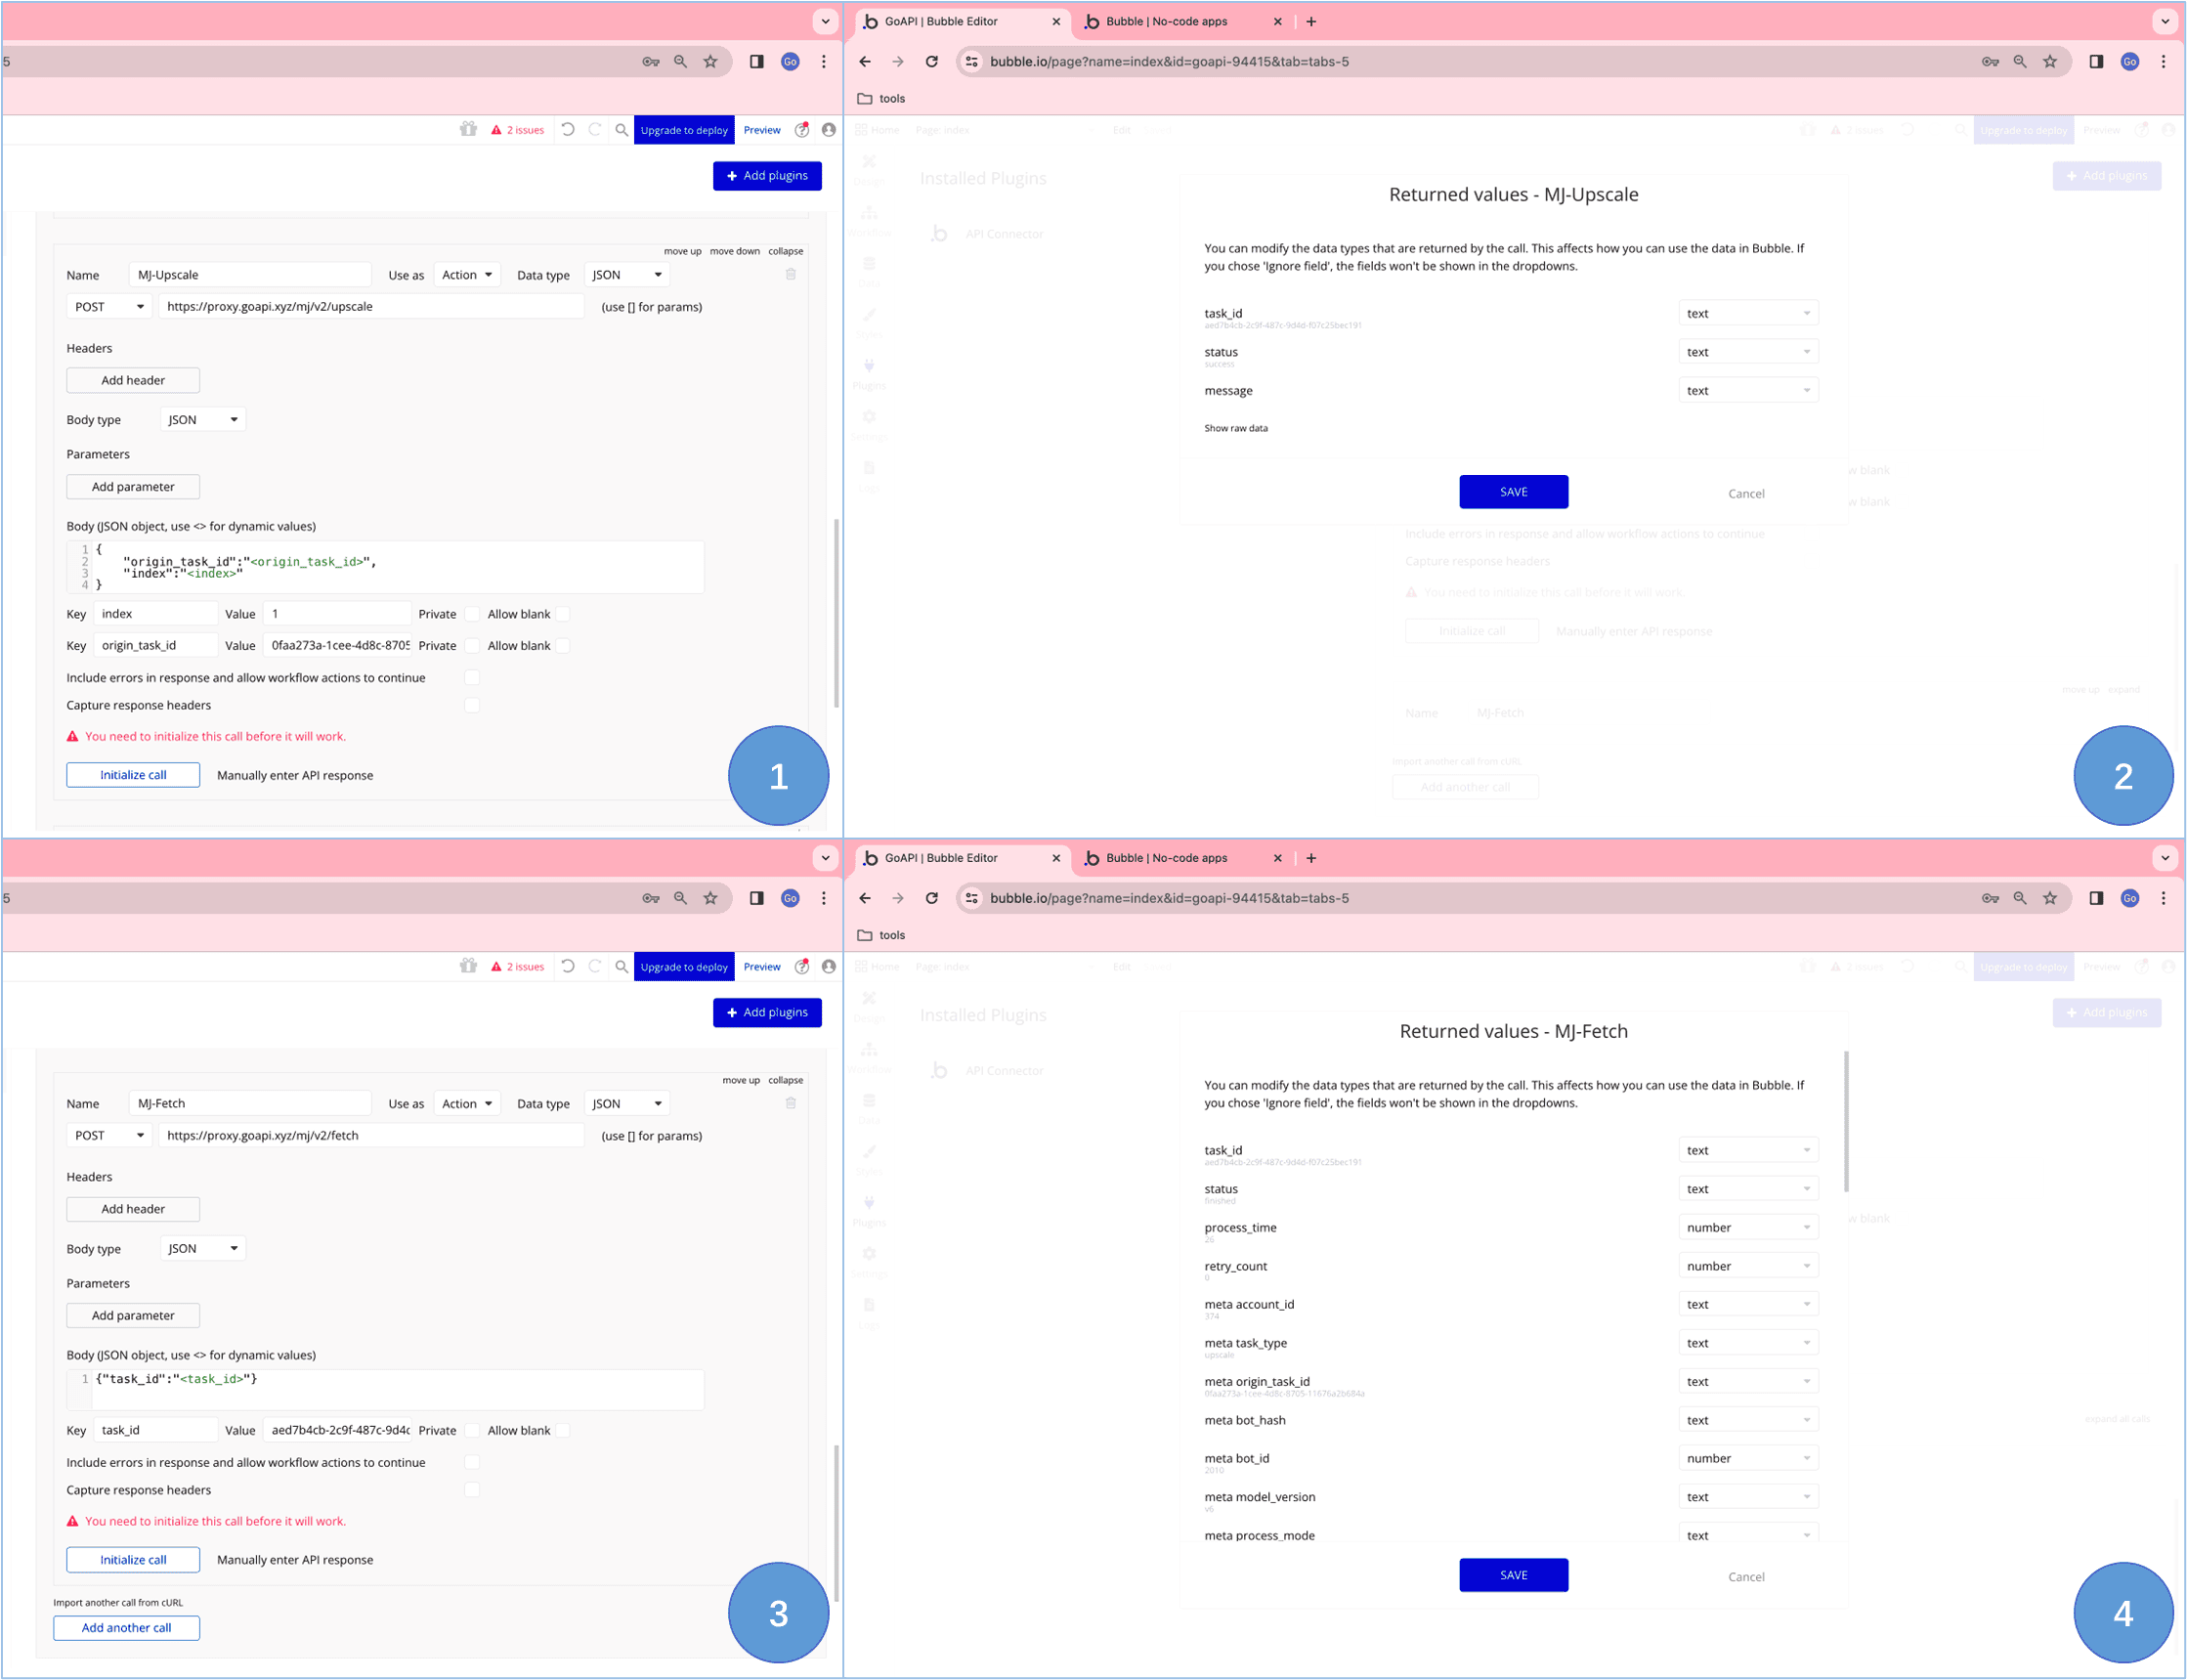
Above shows the settings used for the fetch and upscale endpoints - extra attention should be paid to the returned value settings in the illustration.
Designing the Page
After setting up the endpoints in the API Connector, let's now move on to designing the basics of the app in Bubble!
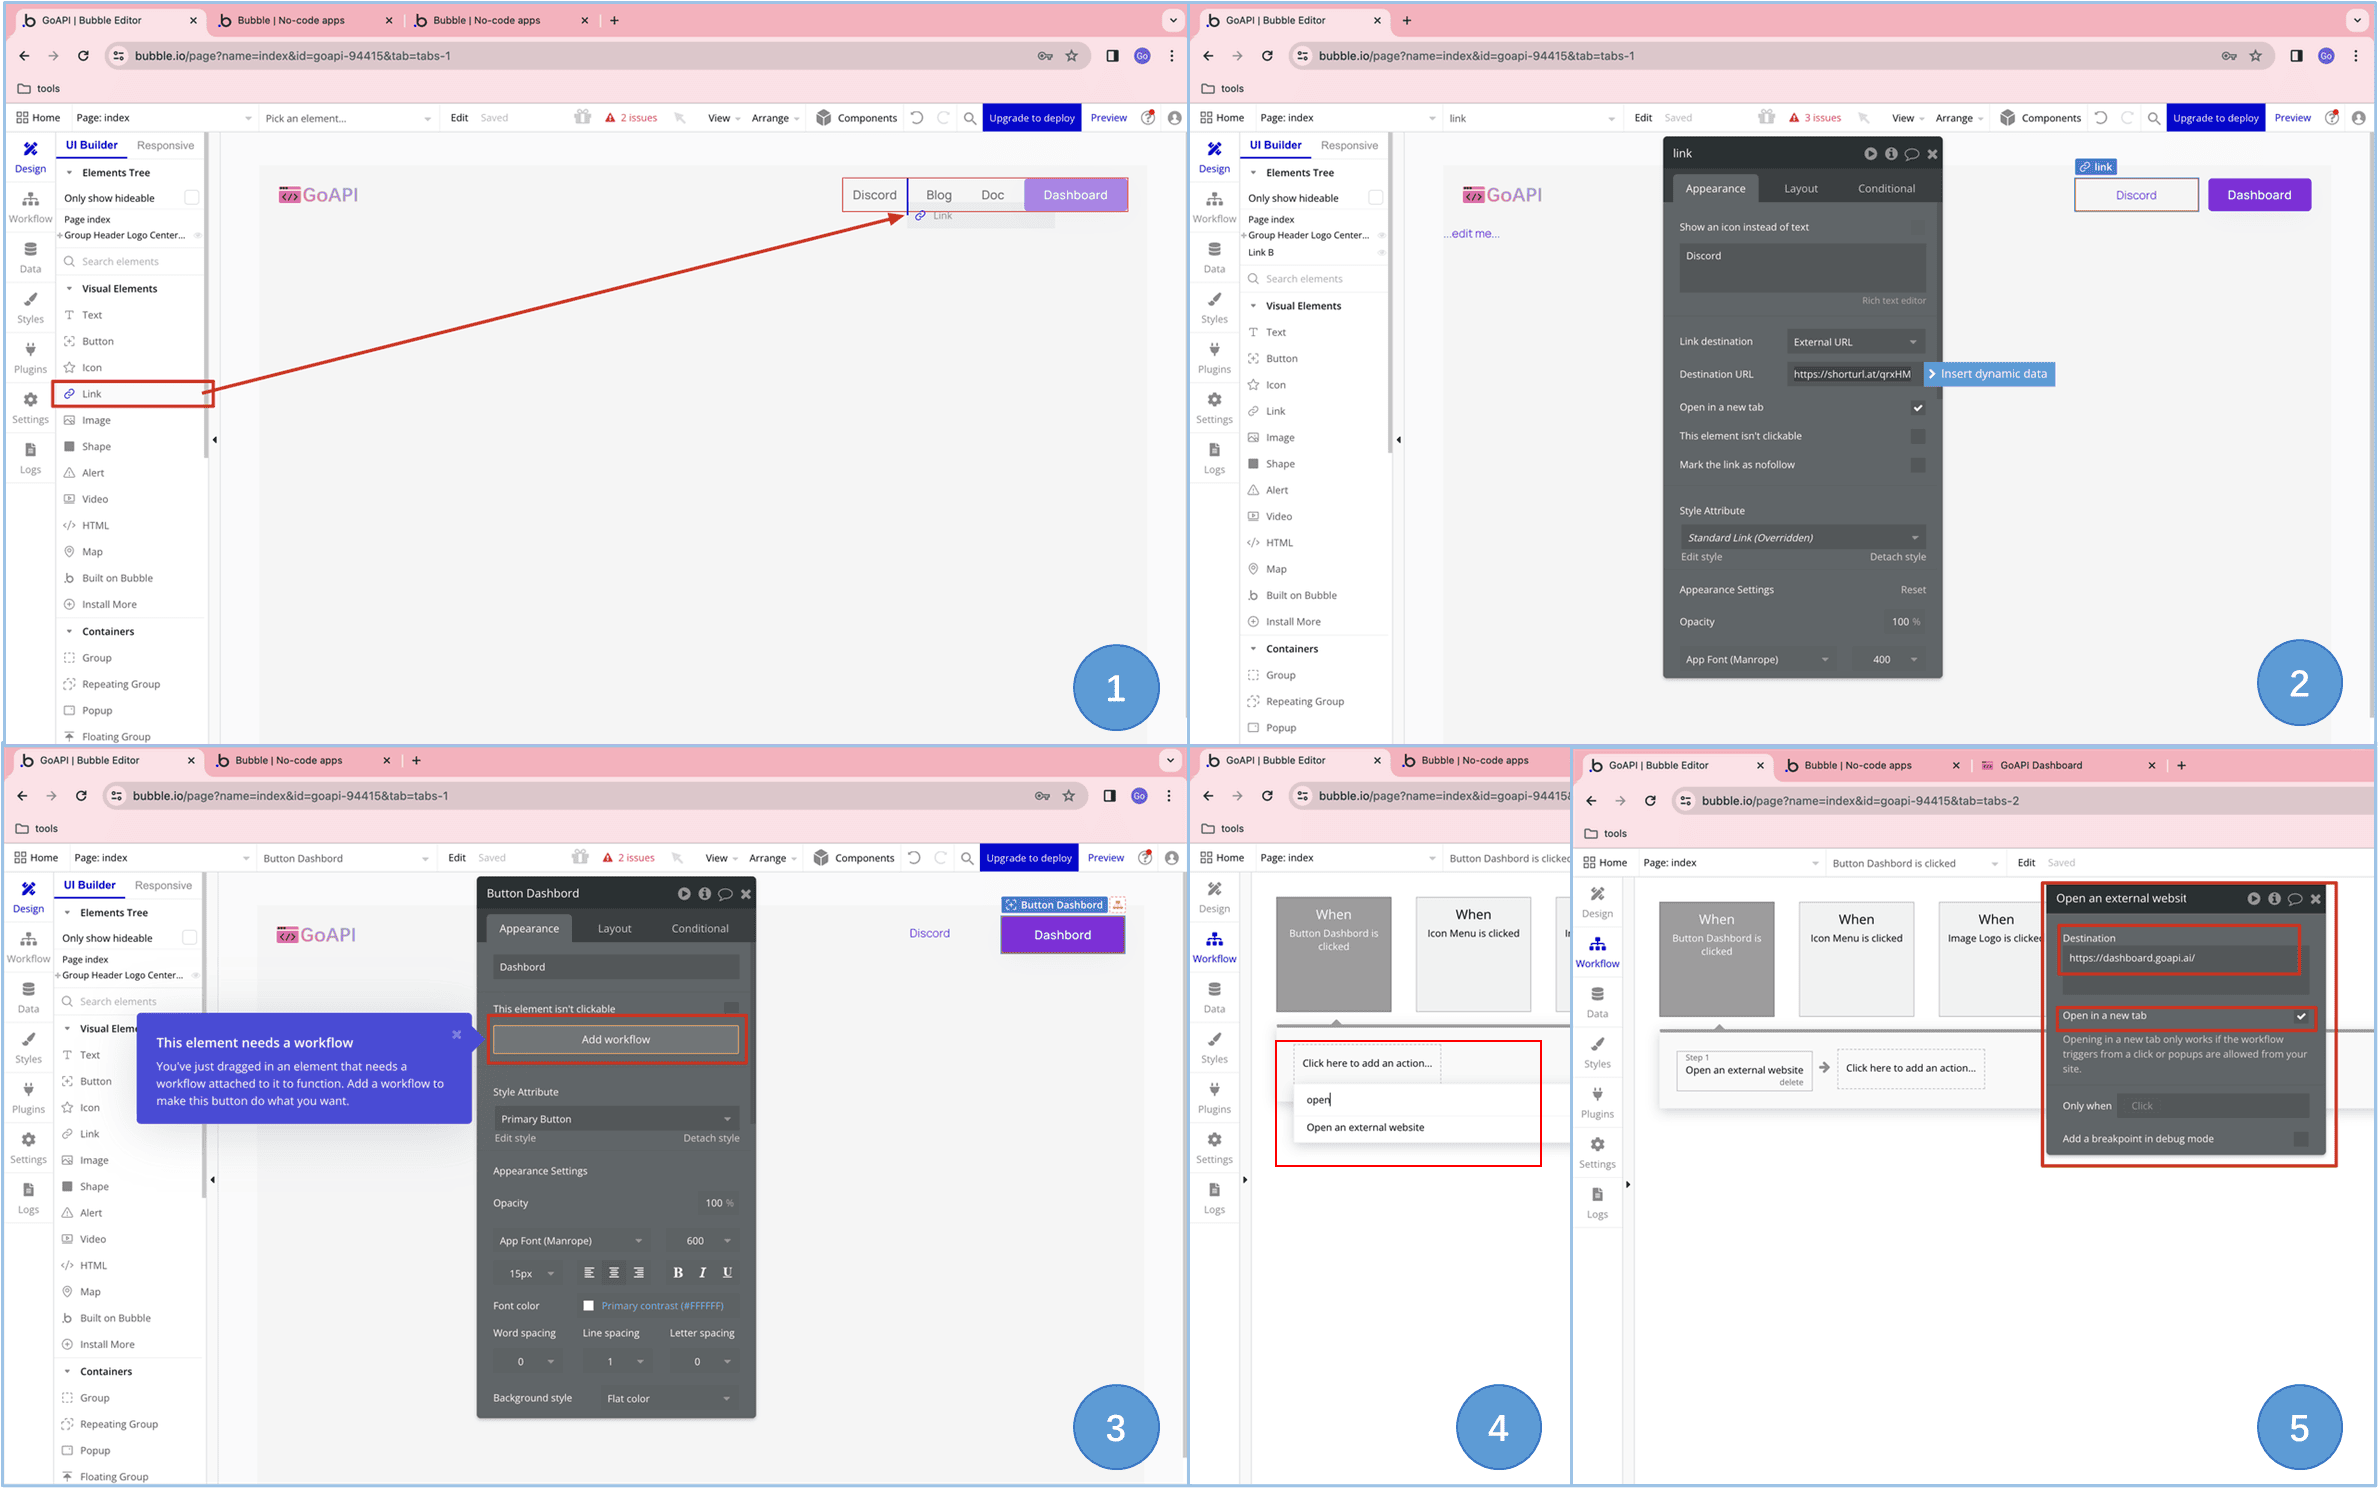
As shown above, user can customize links and button actions in Bubble as well:
- 1.Drag the 'Link' element to the top right corner, and delete the unused menu(s)
- 2.Select the 'Link Destination' (external URL or internal page), and choose External URL
- 3.For buttons action, click on the 'Add workflow' button
- 4.Under 'When xxx button is clicked', search for 'Open an external website'
- 5.Input the destination url and check the 'Open in a new tab'
Adding Content and New pages
After links and different button actions, we will now try setting up the page content and new page(s).
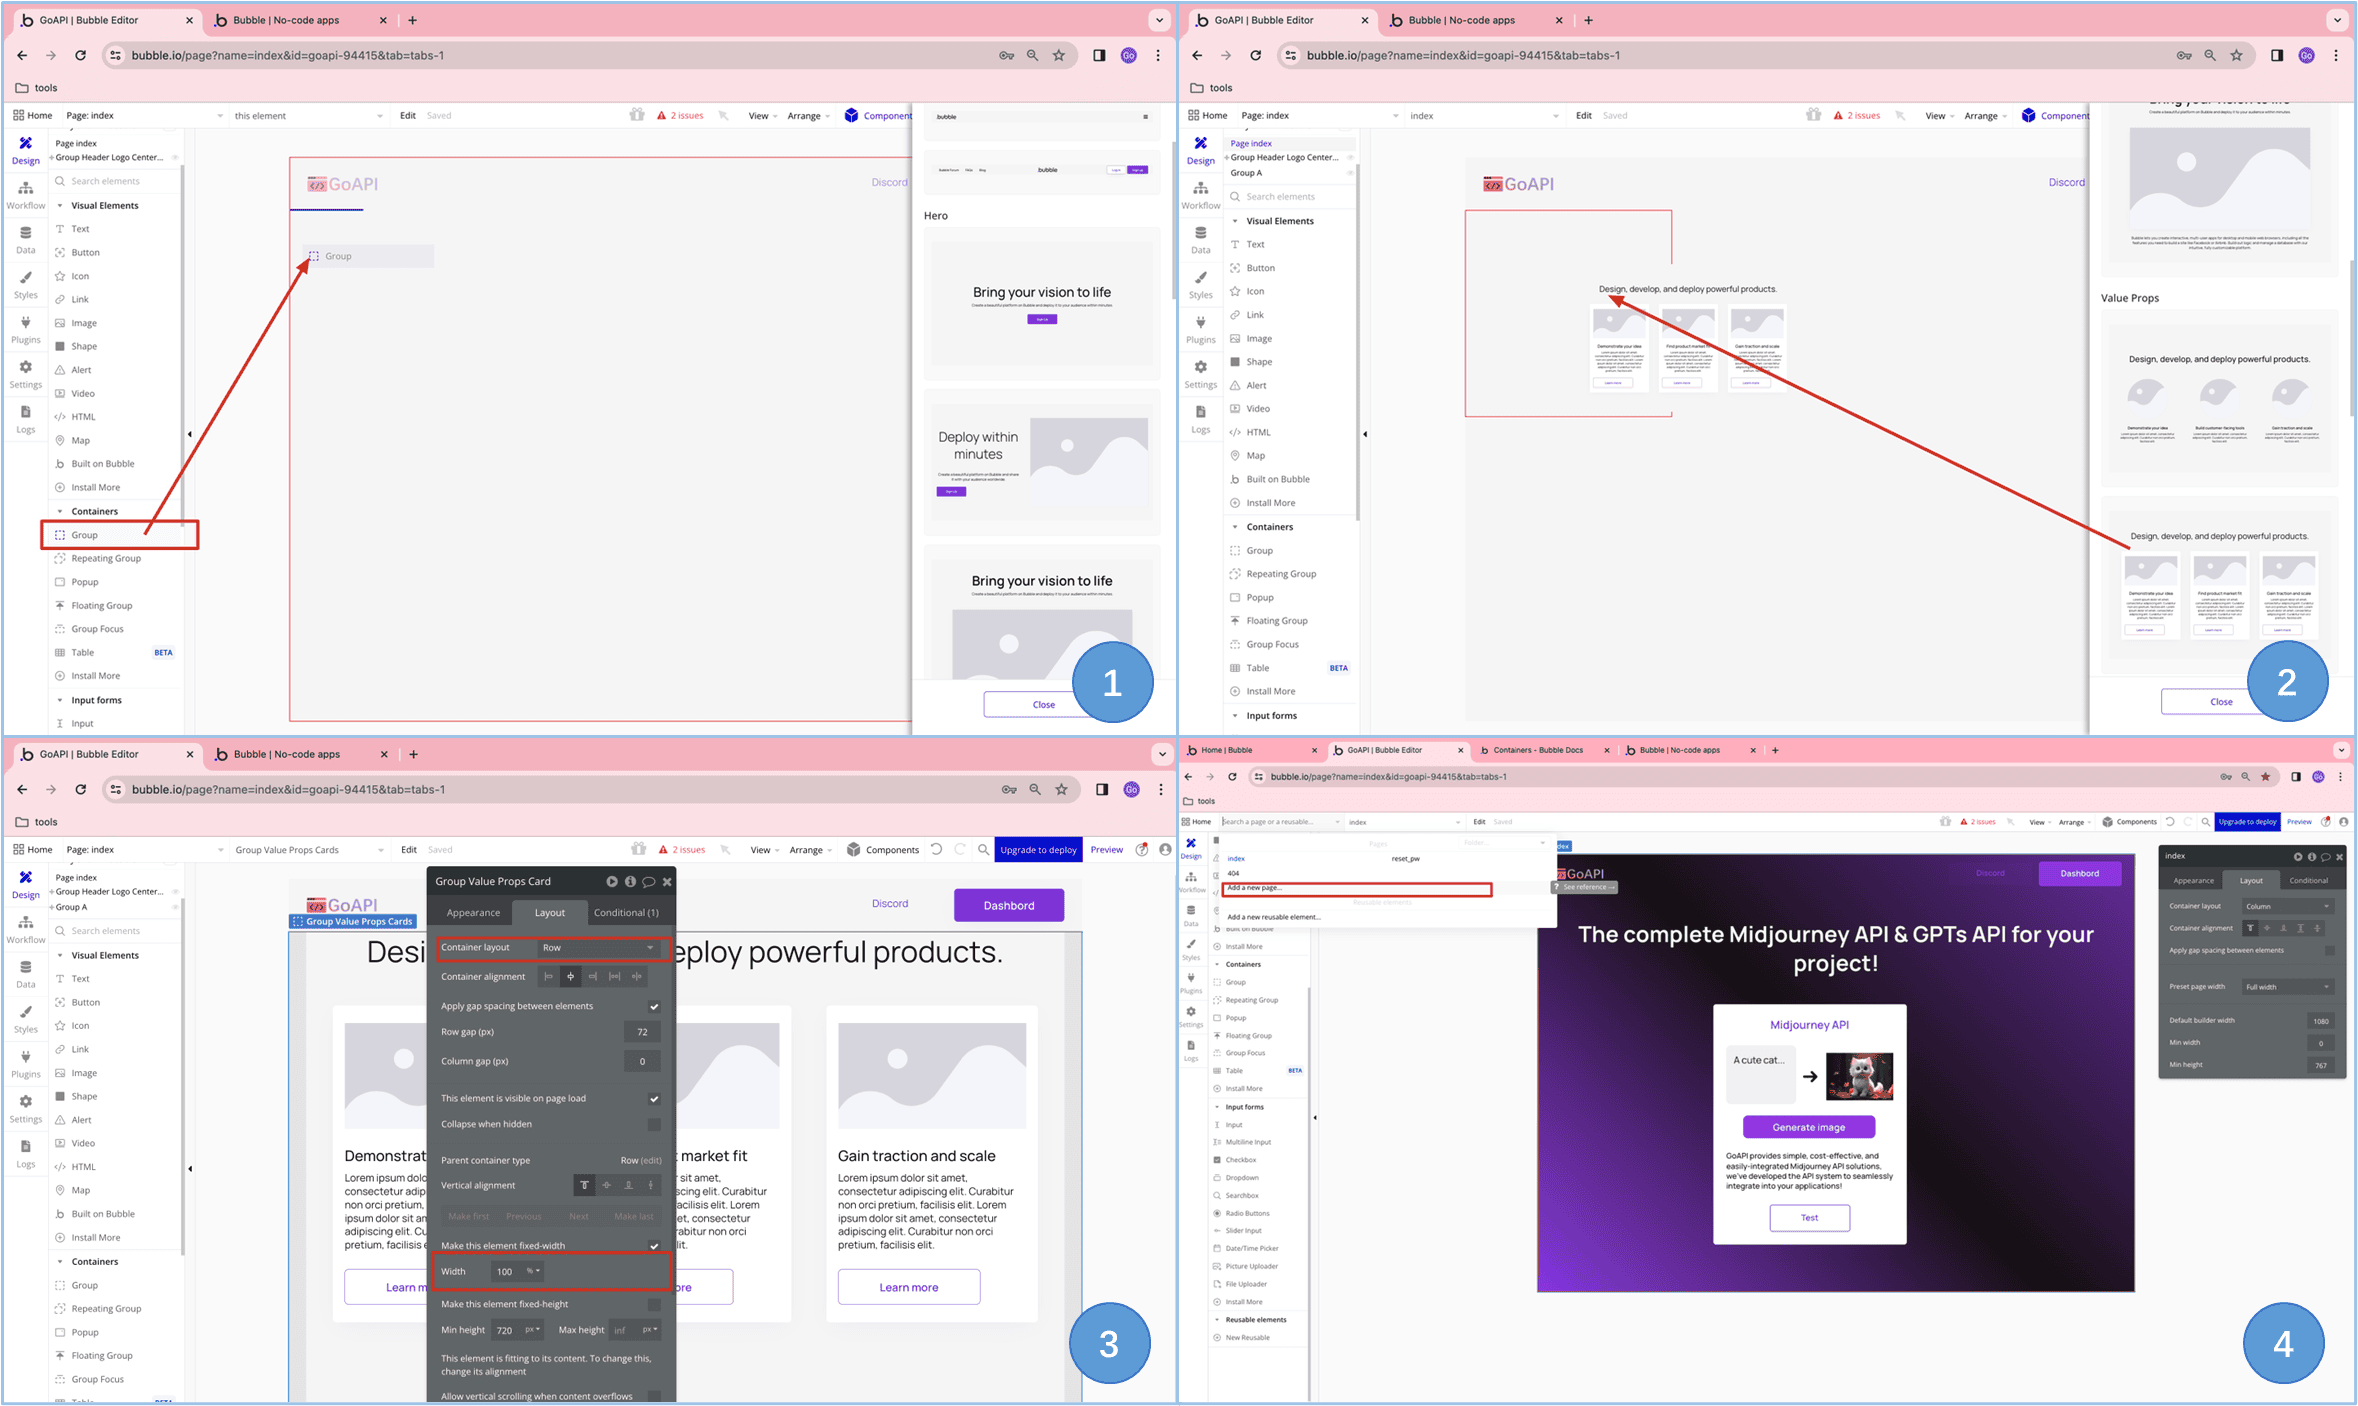
As shown above, user can customize the page contents and add new pages:
- 1.In the left selection menu in Bubble, click on 'Containers' to expand, and click on 'Group' to drag and drop onto the page
- 2.From the content template on the right, drag and drop the desired content template into the container
- 3.Use the customization menu to change layout options (ex. row, width, height etc.)
- 4.Further customize the page to your desired looks, in this example shown, we just changed it similar to the style on our GoAPI webpage. Also, on the on left corner, you can clcik on 'Search a page...' and press 'Add a new page' to add a new page
Midjourney API Implementation
Next, we are going to show how to connect the Midjourney API on a simple, customized page.
- 1.
We will start off with a simple page design for illustrating the content in this part (the layout of the page might change in-between screenshots, please ignore the changes in layout and follow the relevant keypoints regarding API setup). On this page we start with the following relevant elements:
Element CategoryElement TypeElement NameOthersContainersGroup'MJ-Fetch' or 'F'1. This element name was changed midway during the creation of this tutorial, please read them interchangeably.
2. All the inputs and buttons below are part of Group MJ-Fetch
Input FormsInputInput A1. Content Format: text
Visual ElementsButton1/2/3/4/2x/4x-Visual ElementsButtonGenerate-ContainersRepeatingGroup-1. Type of Content: text
Visual ElementsImage-- - 2.
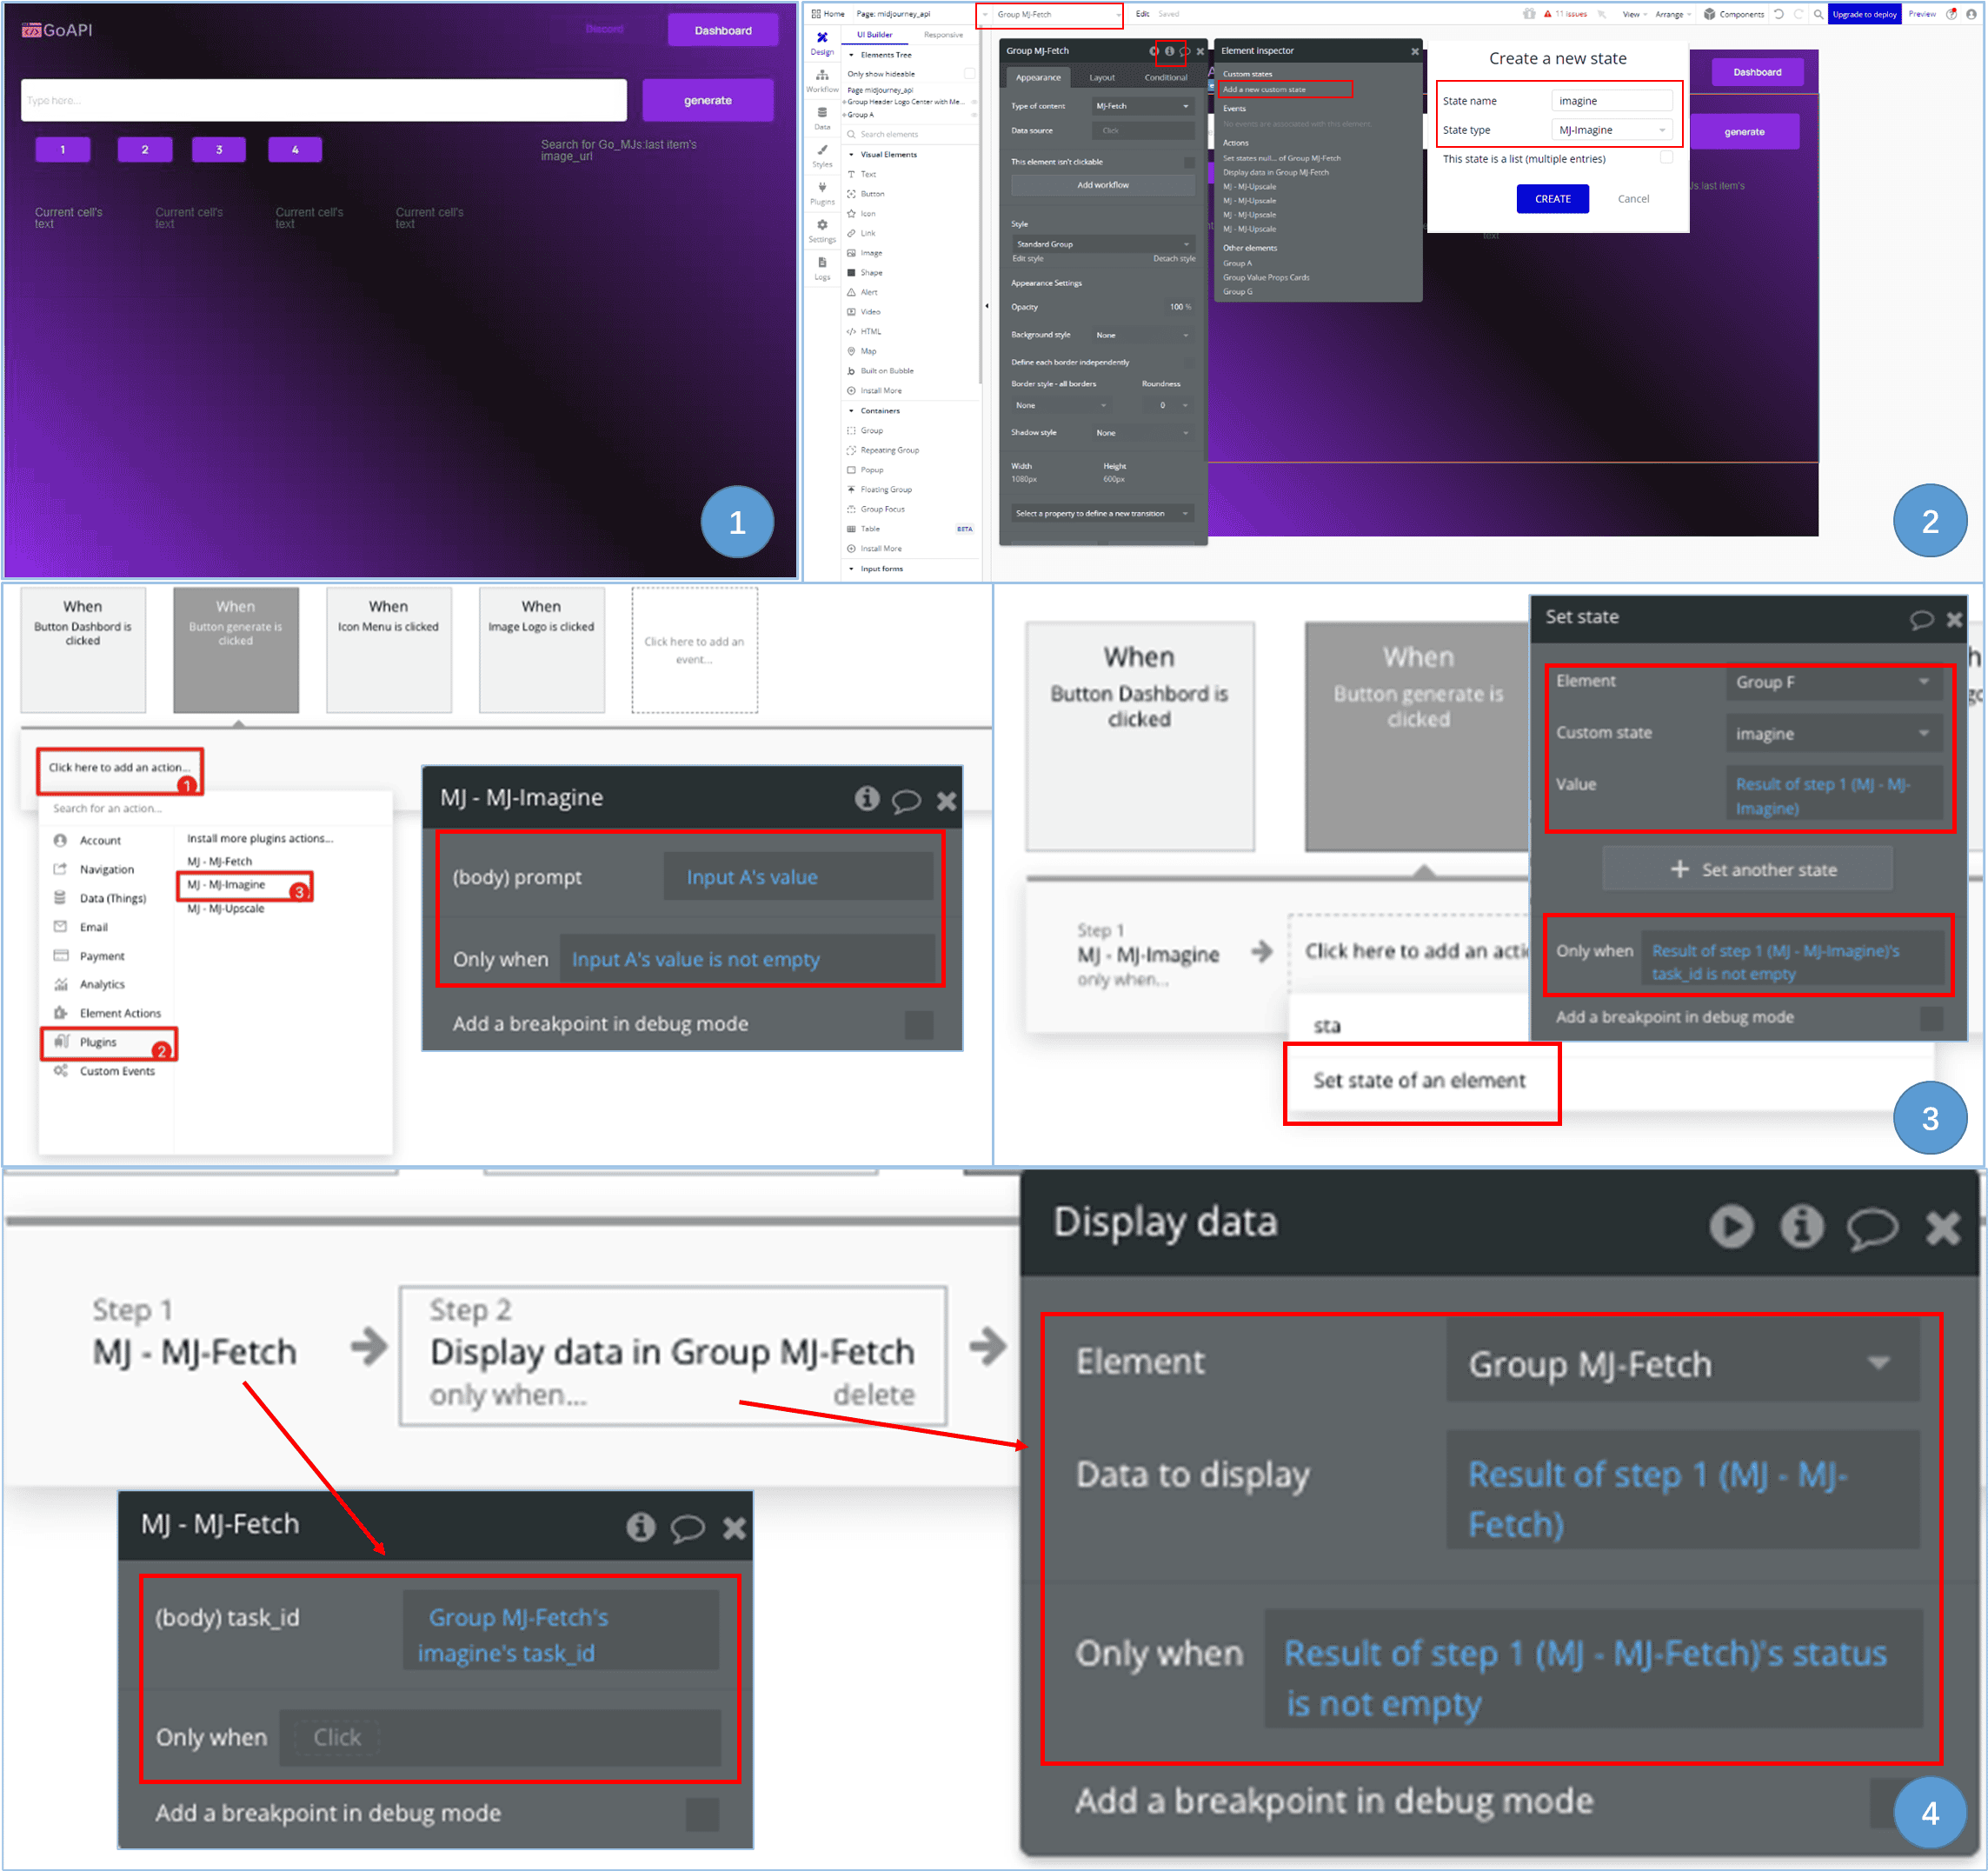
Setting Group's Custom State
| In the 'Search for an element' bar on the top left, search for 'Group MJ-Fetch', open up the menu bar, click on the circular 'i' icon, and click on 'Add a new custom state', and enter the state name and type. This 'imagine' custom state will store the imagine endpoint's response, so that we can extract the taskID for future usage. - 3.
Setting Generate Button Workflow
| Click on the 'Workflow' button on the left side of the menu bar, then 'When Button generate is clicked', add the step 1 action (an plugins action) of MJ-Imagine. The prompt will be 'Input A's value', and acts only when 'Input A's value is not empty'. Then, add step 2 action of 'Set state of an element', with custom state 'imagine', value of 'Result of step 1' only when its value is not empty. By doing this, we are setting Group MJ-Fetch's imagine state to the value returned by the Imagine API response. up the menu bar, click on the circular 'i' icon, and click on 'Add a new custom state', and enter the state name and type. This 'imagine' custom state will store the imagine endpoint's response, so that we can extract the taskID for future usage. - 4.
Setting Fetch Button Workflow
| Design another fetch button on the page, we are now going to give its own workflow. For the first step, we are sending the taskID through the Fetch Endpoint upon clicking the fetch button. For the second step, w we are saving the textual response from the Fetch Endpoint in GroupMJ-Fetch's data.
- 1.
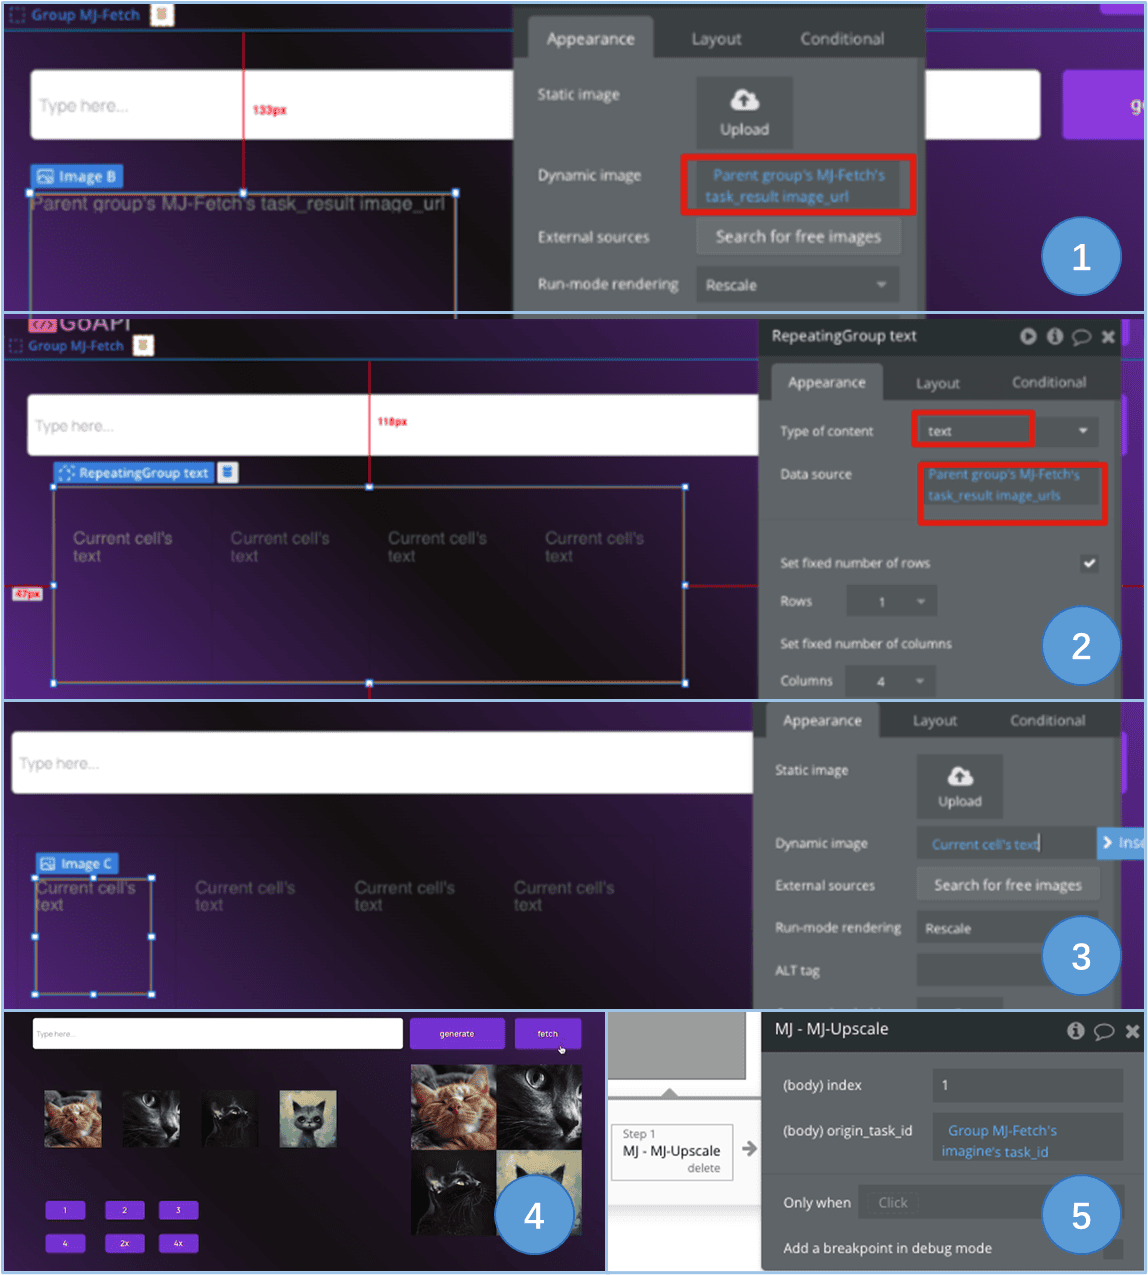
Designing Image Display Areas
| Go back to the page and add an image element into the Group. Set the Dynamic image value to 'Parent Group's MJ-Fetch's task_result image_url', to display the single 2x2 image returned by the fetch endpoint. - 2.
Designing Image Display Areas
| Create a RepeatingGroup for the 4 separate pictures from image_urls, and set RepeatingGroup's Data source to Group's MJ-Fetch's task. - 3.
Designing Image Display Areas
| Drag an image element into this RepeatingGroup (do this four times) and set each image element's Dynamic Range to 'Current cell's text'. This will allow each of them to display the 4 separate images from the returned image_urls. future usage. - 4.And voila! Upon clicking 'generate', wait for a bit, and click on 'fetch', you should be able to see the images shown in the illustration!
- 5.For setting up the upscale & fetch endpoints combination, it will be the same as the imagine & fetch endpoints combination, except for when binding workflows for the upscale actions, it will be 'Group MJ-Fetches' imagine's task_id' for the origin_task_id.
Webhook Implementation
Now, let's try to implement the webhook method of automatically displaying images when the tasks are done, instead of manually waiting for the task and pressing the fetch button.
- 1.
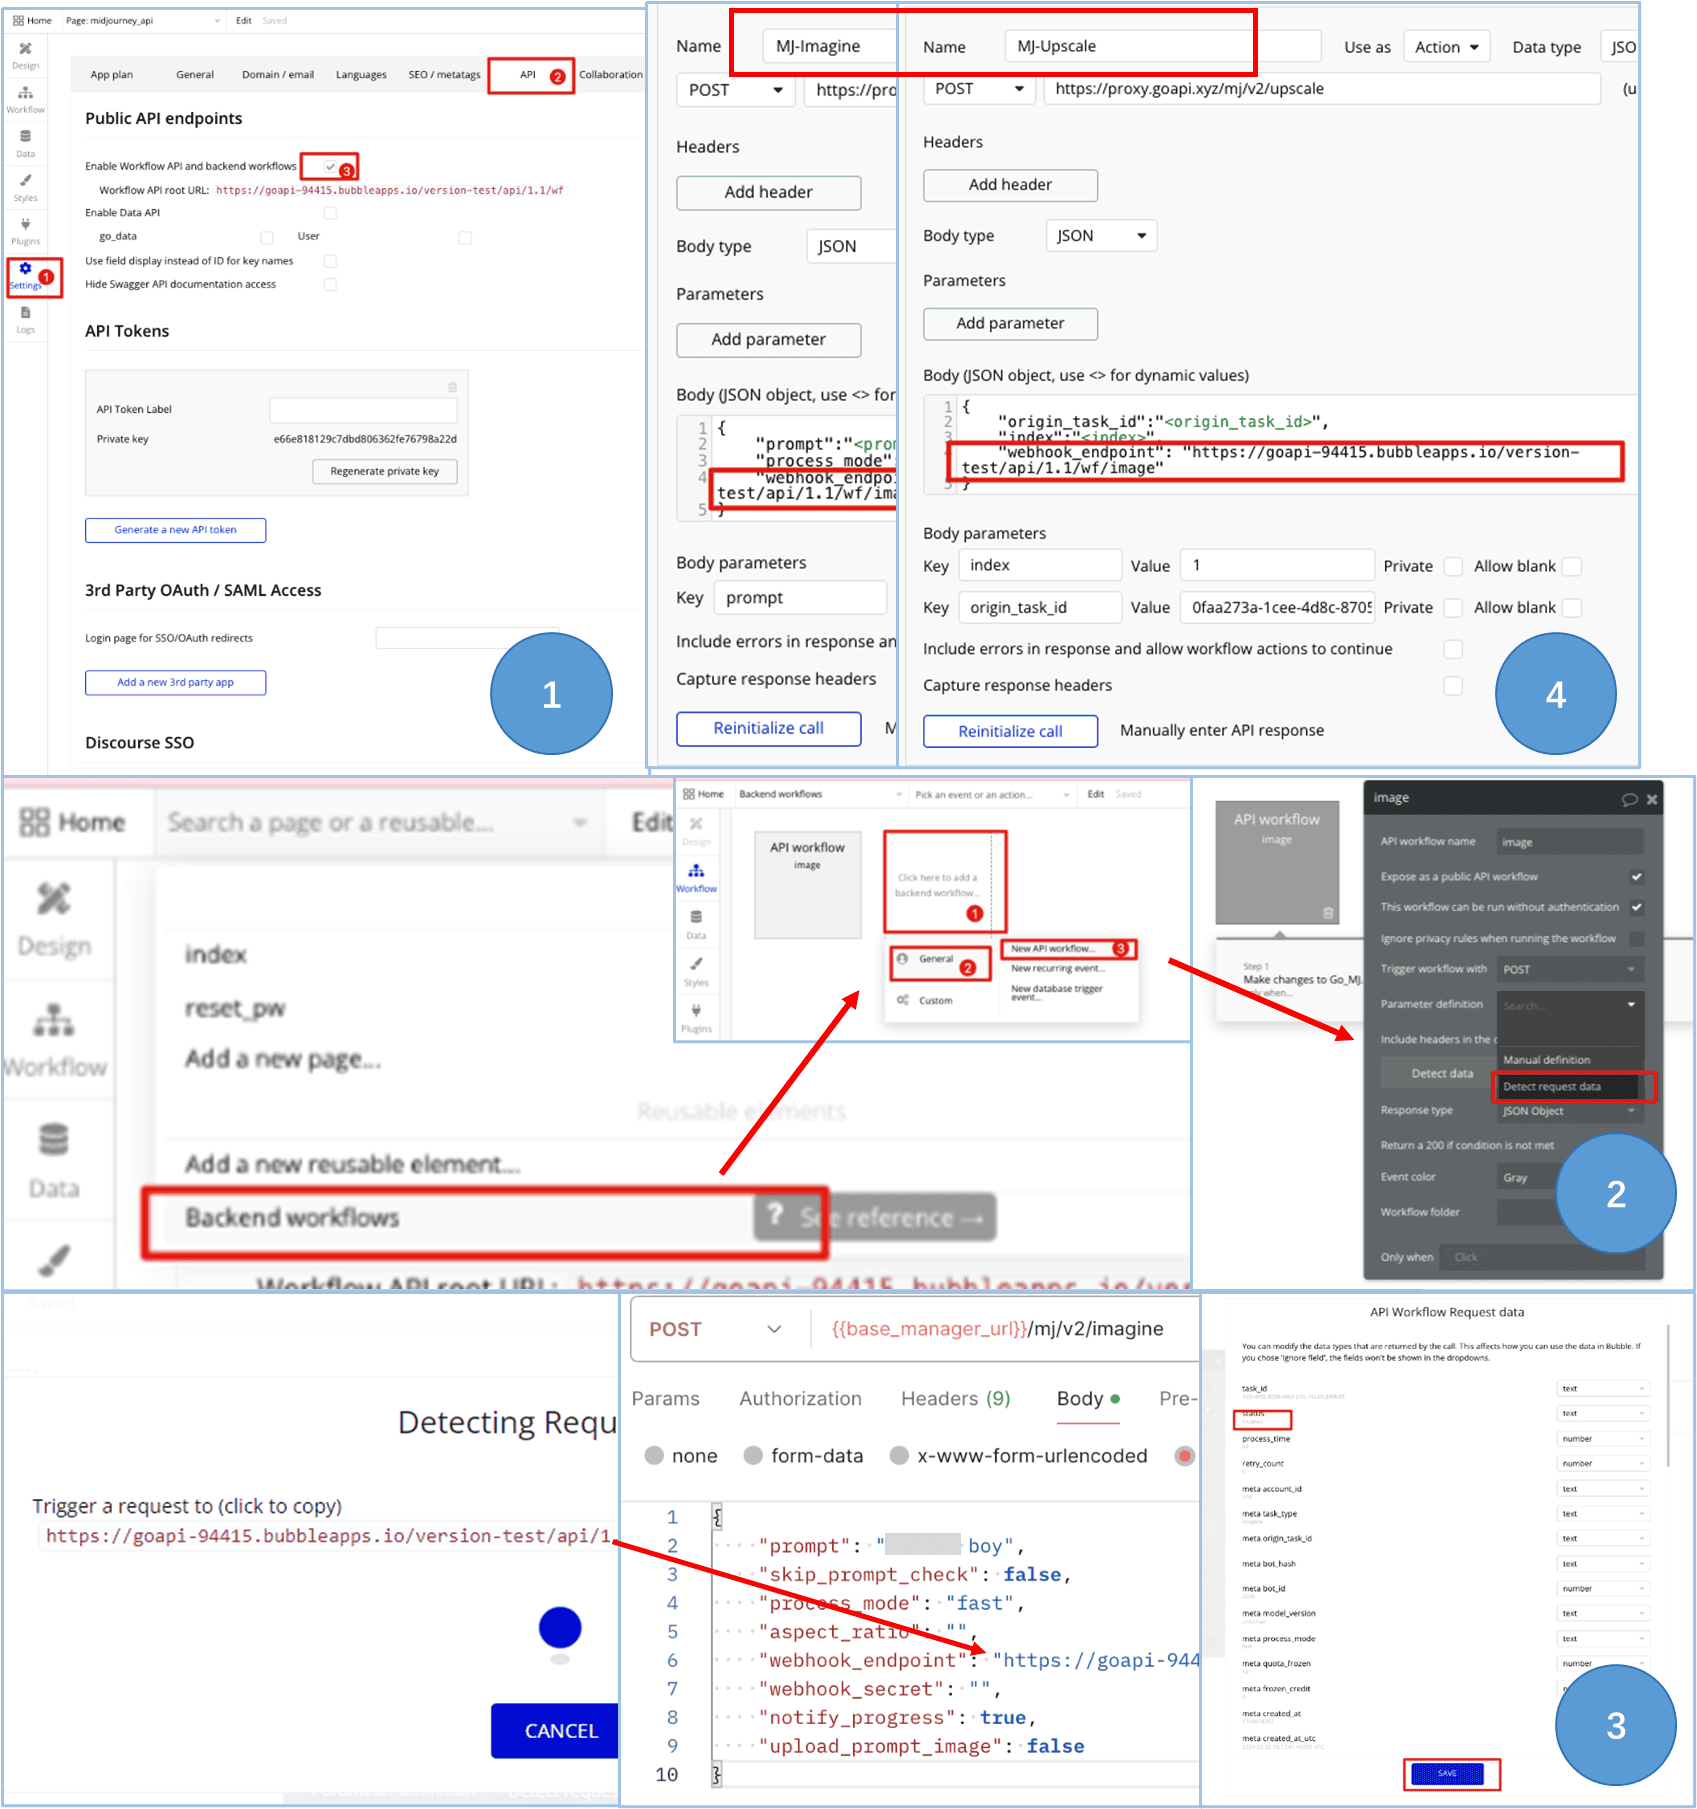
Initializing the webhook feature
| Go to 'setting' in the menu on the left, select 'API', select 'Enable Workflow API and backend workflows' - 2.
Setting up the Webook
| On the top left 'Search a page or a resuable' bar, search for 'Backend workflows', and proceed with creating a new API workflow. Under 'Parameter definition', we are going to use 'Detect request data'. - 3.When the page redirects to 'Detecting Request Data', copy the webhook url and send a test imagine endpoint API call to GoAPI with the webhook url. Note that when the GoAPI task's status goes from pending to processing, the wehbook will send the Bubble test some data, at this time, please click on 'cancel', 'Detect Data', and continue waiting. When the GoAPI task's status is finished, press 'save' then, so that Bubble would then know the correct webhook data structure.
- 4.
Adding webhook address in the Imagine and Upscale Endpoint Setup
| Now, we go back to the API setup for the imagine and upscale endpoints and add the webhook endpoint parameter with the url provided by Bubble. Note please delete the '/initialize' texts at the end of the provided url as it is only needed in the Detecting Request Data phase.
Displaying Images sent by Webhook
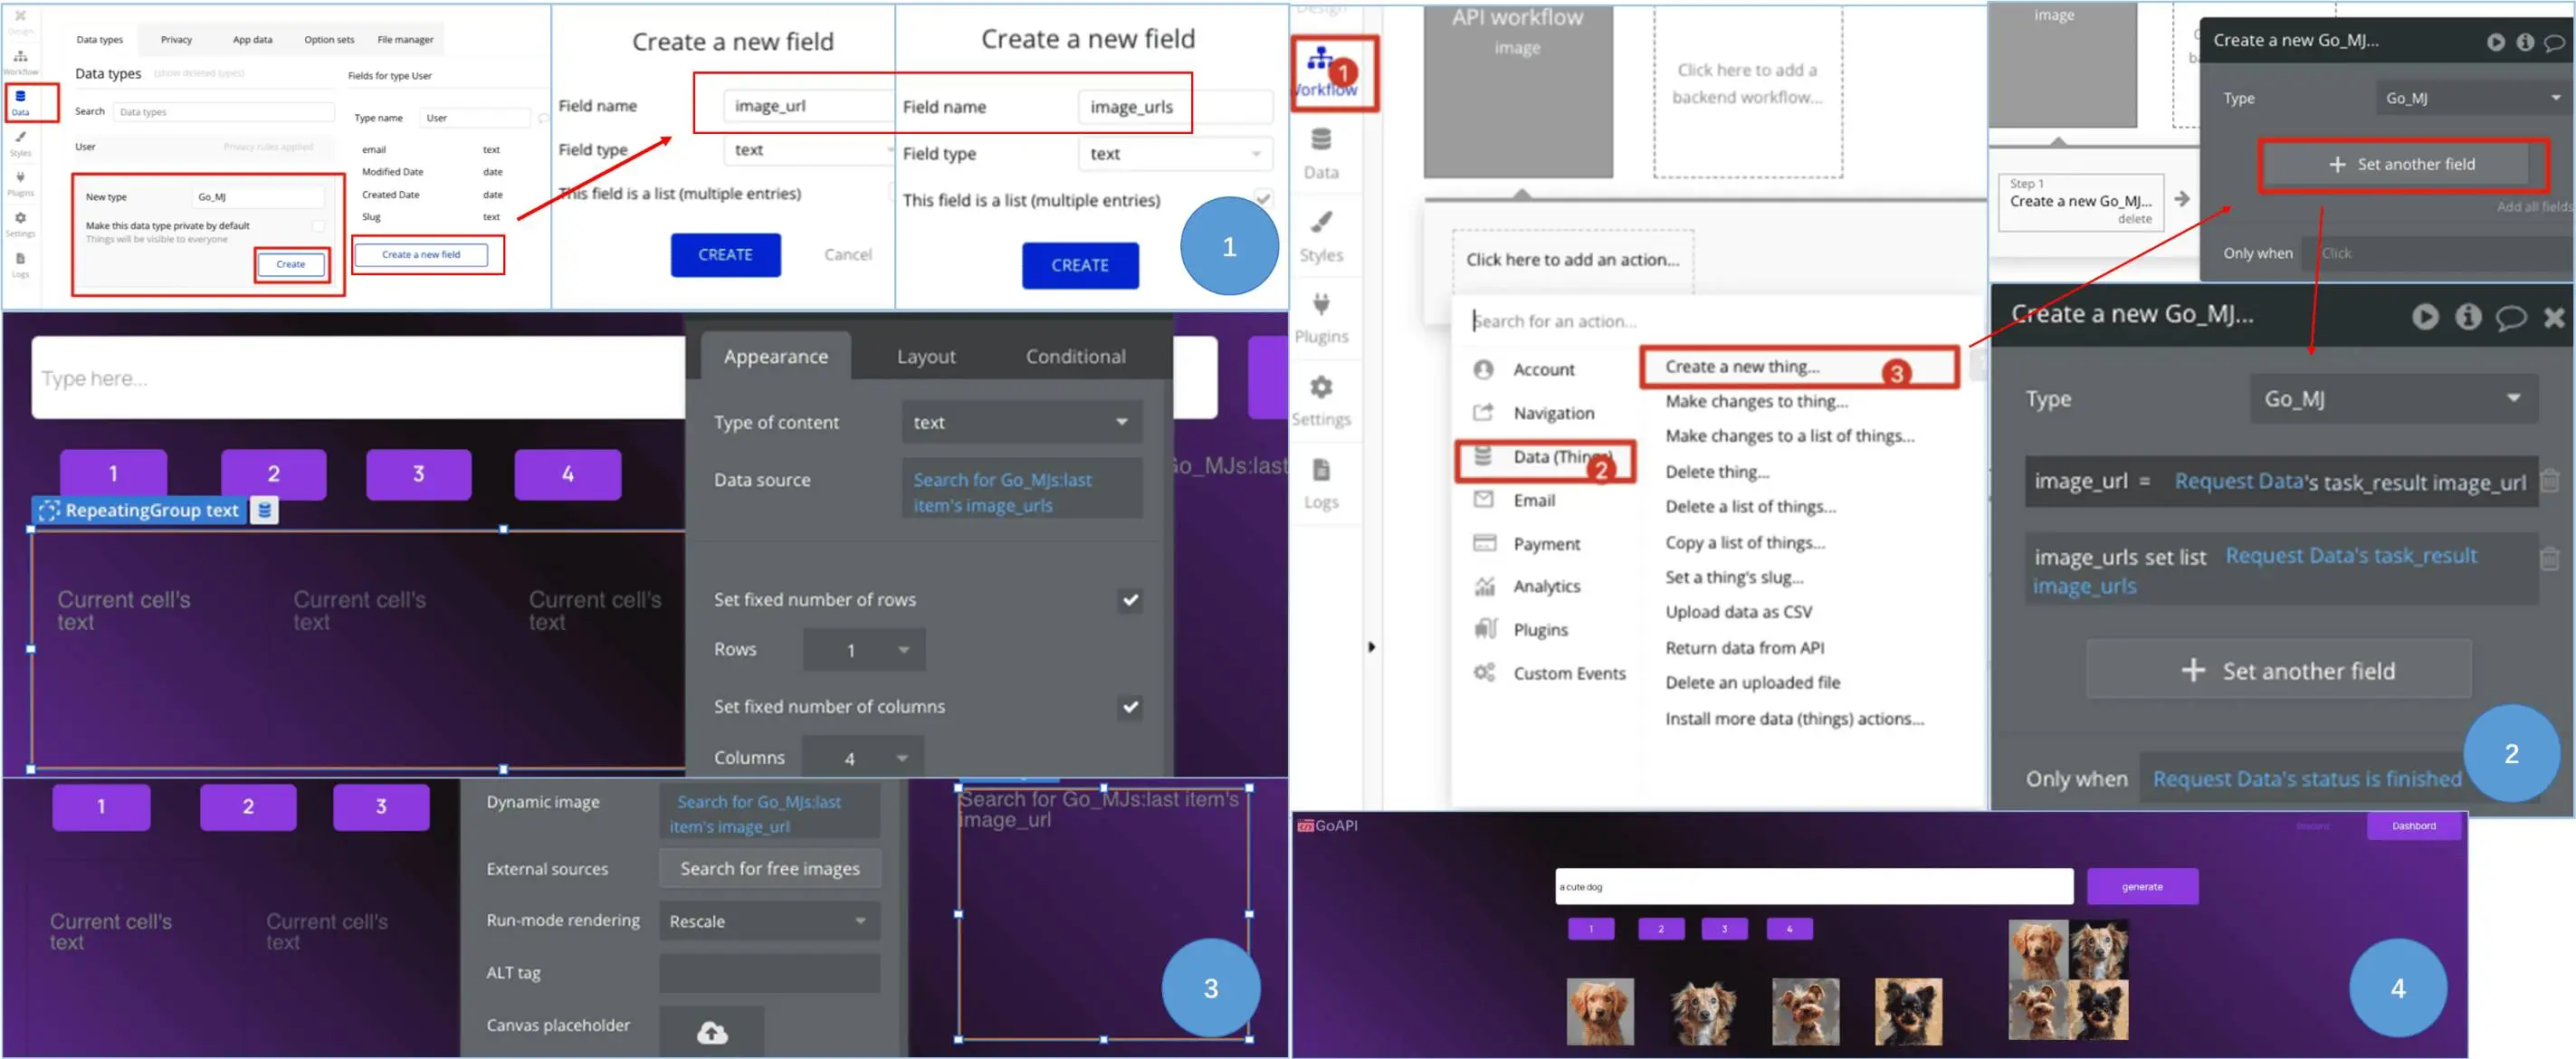
- 1.When GoAPI sends a POST request to the Bubble APP through the webhook url, the Bubble APP needs to first store the incoming data, and we do this by creating a new 'Data types' under 'Data'. Press 'Create a new field' and we will create two new fields (for image_url and image_urls) to store the data sent back through webhook.
- 2.Then go back to Workflow, under 'API workflow', add an action, select 'Data (Things)', 'Create a new thing...'. Under image, we create a new step of type Go_MJ, 'set another field', and set 'image_url' equal to 'Request Data's task_result image_url', and set the 'image_urls' list to 'Request Data's task_result image_urls'. Now, we have saved the desired temporary data sent from webhook to the Data fields (ex. image_url, image_urls) set up by us.
- 3.Now we go back to the page, set the RepeatingGroup's Data source to 'Search for Go_Mjs:last item's image_urls'; and set the image's Dynamic Image to 'Search for Go_Mjs:last item's image_url'. Note that the 'last item' part refers to when you go to 'Data', then 'App data', you can see all the image_url and image_urls are part of a single array. Thus, you need to use 'last item' to refer to the newest (latest) item in the array.
- 4.And voila, now when you press generate, the webhook implementation will allow for automatic display of the generated images upon completion!
Conclusion
And that is it! We hope you found this Bubble App tutorial useful when it comes to integrating our Midjourney API! Happy building and looking forward to seeing the apps that you build!